|
Evaluation Version requires registration - no key needed |

|

|

|

|
|
Evaluation Version requires registration - no key needed |
|
|
|
|
If you want to offer an evaluation version, and the evaluation version should only start after it has been registered and activated, you can implement this with a few additional DLL calls. The user can download the demo version, activate it and use it. If the evaluation version should be usable only after the user activates it with a Serial number, see workflow: Evaluation Version requires Activation - Serial Number needed
The testing has to be done before you use PrepareAndCheck with EasyGo.
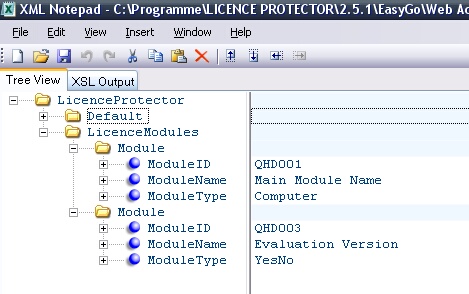
Modify the Project Template and add a new module with type Yes/No (module type = 4). This module is only used for activation of the demo version. Set the default value for this module to No and name it e.g. Evaluation Version.
Implement this logic at the start of your application:
| • | Open the license file without user interface - PrepareAdvanced - (in case of an error continue with EasyGo logic) |
| • | Check if the module Evaluation Version is set to No with ValidatesYes - this indicates that the demo version was not activated |
| • | If it is No (return code 3) then the demo version has to be activated (all other errors continue with EasyGo logic) |
| • | Retrieve all installation codes of the machine with GetInstCode and add all codes to one string. This will be the unique identifier for the Activation Server |
| • | Pop-up a screen to type in the user name or any information you like. Send the data to the Activation Server using SendCustomerInfo |
| • | Activate the module using WebRegister and use the combined string from the installation codes as the parameter ID. As a project name use your project name + evaluation - e.g. easygo-evaluation. This is necessary to have a different workflow on the Activation Server |
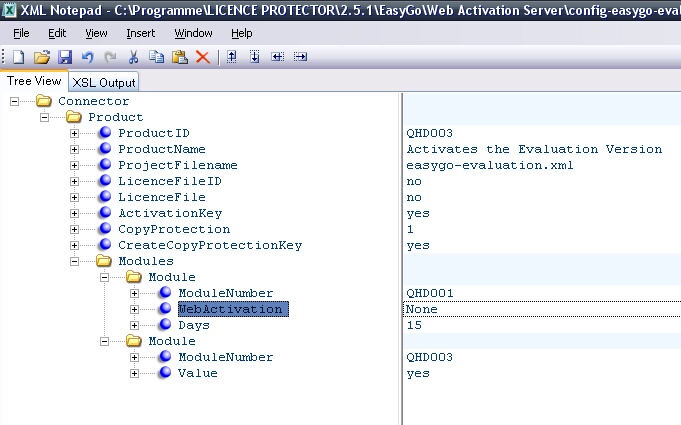
| • | On the Activation Server define a workflow for this module - e.g. to send out an Activation Key which will add 15 days for the main module and also set the module value of the Evaluation Version module to Yes |
| • | If you like you can remove the module Evaluation Version with DeleteModule. The only reason for removing the module is not to display it in the License Viewer. Otherwise the module would have the value Yes and its status is set to Activation Done |
If the user would uninstall the application and install it again, the WebRegister command would result in an error because the unique ID (the string with the installation codes) is already registered.
| • | Continue with the standard EasyGo logic using PrepareAndCheck |
Create a license file with an additional module. The main module should be set to expired so that it is only possible to continue if the Evaluation Version was activated. The module Evaluation Version should be set to NO to indicate, that there was no activation done.
|
Activation Server - Configuration Settings
You have to add a new project and the configuration files for the project. Although the template is the same the workflow is different because you use a new project name.
<Configuration>
<Project> <ProjectID>easygo-evaluation</ProjectID> Own project name
<CheckActivationKeys>yes</CheckActivationKeys> <NoOfAllowedKeyOccur>1</NoOfAllowedKeyOccur>
<CheckEntries>yes</CheckEntries> <EntryRequired>no</EntryRequired> <NoOfAllowedEntryOccur>1</NoOfAllowedEntryOccur>
<InstCodeType1>6</InstCodeType1> <InstCodeType2>1</InstCodeType2> <InstCodeType3>3</InstCodeType3>
<AllowReactivation>No</AllowReactivation> The value must be NO to prevent reinstallation < MinIdenticalInstcodes>3< MinIdenticalInstcodes> <CheckInstCodeType1>1</CheckInstCodeType1> <CheckInstCodeType2>2</CheckInstCodeType2> <CheckInstCodeType3>3</CheckInstCodeType3>
<GeneratorPath>C:\Inetpub\wwwroot\lptest\lpweb\bin\alg</GeneratorPath> <GeneratorApp>AutoLicGenerator.exe</GeneratorApp> <GeneratorConfig>config-easygo-evaluation.xml</GeneratorConfig> Own Configuration File
</Project> |
This file defines the workflow - for general configuration settings see Project Configuration File 2 Activation Keys are generated
Module QHD001 is your main application module which
Module QHD003 is your module for the Evaluation Version
|
Copy your project template to a new name and remove all additional module settings - just leave ModuleID, ModuleName and ModuleType.
|