
All-In-One Protector 8
This application can be downloaded at: http://www.autorun.com . The test was done with version 2.1.0.
The menu application creates an EXE (autorun.exe) file. This file (the menu application) is on the CD or in the download link and it is not protected (don't import it in the All-In-One Protector database).
Start Autorun MAX!.
Step 1 - Add the Publish All Media folder to the Autorun MAX! project
You have to add all files which should be included in the Autorun MAX! project. Select the menu Project, File Layout. In the upper part of the screen open the Publish All Media folder, select all files and add the files to the docs folder.

Step 2 - Define the file to start for each button
Now create your menu and add a button for each file you want to start, e.g. a button with Tutorial 1, Tutorial 2 etc. Then right click on the button and select Properties.
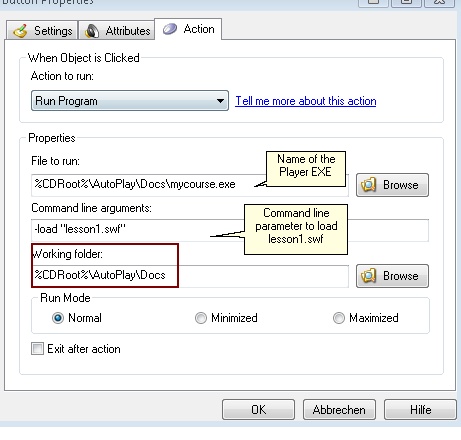
Select: Action to run: Run Program. In the line File to run add the path and the name of the All-In-One Player.exe file from the Publish All Media folder. In the line Command line arguments add the command to load a flash file or PDF file. See chapter Start a specific file inside the database to get all details for this command.
In the screenshot below, the file (Player) mycourse.exe is started and loads the file lesson1.swf. You have to set the Working folder to the same path where the All-In-One Player.exe is located.
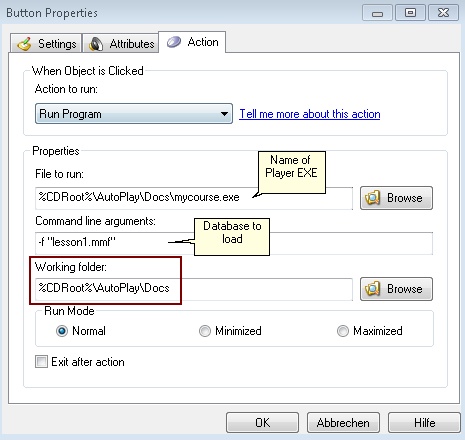
The sample below starts the player with a different database. This feature can be used if you split the project into several databases.
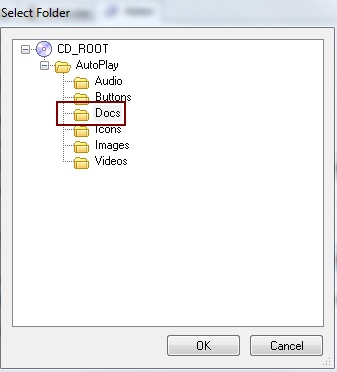
To select the working folder, click on the Browse button and select the Docs folder
 If you don't specify a command line, the main database (same name like the All-In-One Player) is started and the file, which is defined as start file, is loaded.
Step 3 - Build the CD or EXE file for download
In the menu, select Publish, Build. Then select Hard drive folder to test the project.

A good idea is to create a new folder, e.g. cd-project training 1
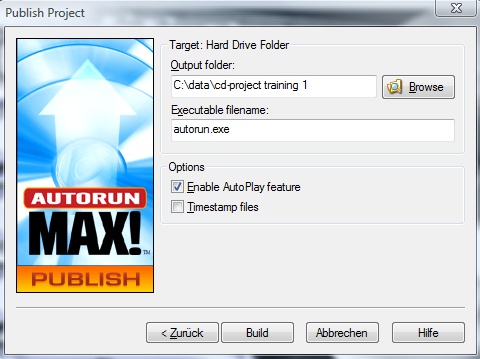
All your files are now copied from the Publish All Media folder to this new CD folder. Click on Autorun.exe to test everything.
Do not use option "Web / EMail executable". If you want to create a download version use the Installation Manager (see chapter below).
 If you make any changes in the All-In-One Protector project, you have to rebuild the CD with Autorun MAX!
List of all start options for the player
Using Installation Manager
If the complete CD content should be copied to the hard disk of the user or if you want to create a download version, you can use the Installation Manager of All-In-One Protector. Copy the file setup.exe and setup.ini to the installation directory created by Autorun Max!.

The general settings are described in the chapter Installation Manager, configuration file Setup.ini. There are special settings required as all subfolders have to be copied. After the installation and also when clicking on the desktop icon, the menu and not the All-In-One Player has to be started.
Find below all differing settings marked in red.
[Setup]
AppName=My Program
AppVersion=3.0
AppPublisher=Universal Software
DefaultDirName=My Program
DefaultGroupName=My Program
[Files]
BinFolder=\autoplay\docs
Exe-Start-Application=Autorun.exe
exe-Filename=\autoplay\docs\mycourse.exe
mmf-Filename=\autoplay\docs\mycourse.aipfile
lic-Filename=\autoplay\docs\mycourse.lic
ico-Filename=\autoplay\docs\mycourse.ico
readme-ces=
readme-dan=
readme-deu=
readme-dut=
readme-enu=
readme-esp=
readme-fra=
readme-ita=
readme-nor=
readme-por=
additional1=autoplay\*
additional2=autorun.exe
additional3=autorun.inf
additional4=
additional5=
additional6=
additional7=
additional8=
additional9=
additional10=
additional11=
additional12=
additional13=
additional14=
additional15=
additional16=
additional17=
additional18=
additional19=
additional20=
additionalfolder1=autoplay
additionalfolder2=
additionalfolder3=
additionalfolder4=
additionalfolder5=
additionalfolder6=
additionalfolder7=
additionalfolder8=
additionalfolder9=
additionalfolder10=
additionalfolder11=
additionalfolder12=
additionalfolder13=
additionalfolder14=
additionalfolder15=
additionalfolder16=
additionalfolder17=
additionalfolder18=
additionalfolder19=
additionalfolder20=
[Options]
InstallPDFViewer=false
OverwriteLicenseFile=true
RunPlayerAfterInstall=false
RunPlayerAfterInstallNetwork=true
RunBeforeInstall=
RunBeforeInstallNetwork=
RunAfterInstall=autorun.exe
RunAfterInstallNetwork=
[USB]
use-usb=true
[ProgManGroup]
ShowLicenseInfo=true
ShowLicenseInfoNetwork=
ShowReadmeFile=false
DBFileName01=
EmbeddedDBFileDesc01=
EmbeddedDBFileName01=
[Uninstall]
AppComments=(C) 2009 Universal Software, Inc.
AppContact=office@universal-soft.com
AppPublisher=Universal Software, Inc
AppPublisherURL=http://www.universal-soft.com
AppSupportURL=http://www.universal-soft.com/support
AppUpdatesURL=http://www.universal-soft.com/downloads
Installation Manager
To install a download or a CD version to the hard disk including adding a desktop icon or program manager group entry, use the Installation Manager.
Create Download Version
In case you want to deliver one EXE file as a download version see chapter: How to create a download version in EXE format?
Otherwise just ZIP all files.
Also see: How can I share my files using a download link?
See also
Start a specific file inside the database
Split project into several databases
All command line options
Additional Menus
