Activation Server 6
The installation package checks if all necessary system requirements like IIS, ASP.NET are available, creates the database and configures the Activation Server 6.
Ensure that you have an own instance of the MySQL Server running before you start the installation.
If you install on a server with an existing version of the Activation Server 6, see Install Updates
Install Activation Server 6
Now you are ready to install Activation Server 6. To start the installation, execute activation-server6.0.exe
You can click on each screenshot below to enlage it.
1. Check System Requirements / Prerequisites
The installer will first check if you have the required system requirements and prerequisites. If not it will install it.
On some Windows operating systems the following message could appear. Just click on close to continue.

Prerequisite start screen
Never uncheck a required prerequisite

Select Prerequisites

Install Microsoft Visual C++ Redistributable package

Install MySQL ODBC Connector Step 1

Install MySQL ODBC Connector Step 1

Install MySQL ODBC Connector Step 3

Install MySQL ODBC Connector Step 4
2. Select directory and accept license terms
After all prerequisites are installed, the main installer launches.
A default folder is suggested. Before you can continue, you have to check that you agree to the license terms and conditions.

Select directory
3. Select Installation Type
Select if it is a new installation of Activation Server 6 or if you want to upgrade from an older version

Select type of installation
4. Configure MySQL Server
Type in the SQL Servername\instance. To create the database for the Activation Server 6 server, the installer needs the login data and administrator rights to create a database. Specify an existing SQL server user with admin rights - the default user is: root. These credentials are used only to create the database and add users. Type in the password you used during the MySQL Server installation.

SQL Server login
If you get the following error message after clicking on Next,

SQL Server login failed
then either the user name / password or servername / port is wrong. Only if the login test is successful you can continue.
The installer will create a database Activation Server and stores the login details in the file web.config
5. Create application shortcuts
Select the shortcuts which should be created.

Create shorcut links
You provided now all necessary information to start the installation. You could review your settings using the Back button.
The installation files are copied to selected folder. The database is created and the IIS is configured.
 Installation is processed |
IIS is configured |
At the end of the installation the open XML SDK installer launches. Just confirm all steps. Some components could be downloaded over the Internet during that process.
 Install Ajax Extensions - Step 1 |
 Install Ajax Extensions - Step 2 |
 Install Ajax Extensions - Step 3
|
 Install Ajax Extensions - Step 4 |
6. Start Administration Interface
The next step is to start the Administration Interface. Click on Run

Installatioin finished
You will get an additional screen with explanation how to login

First login
If you want to migrate the database from version 4 or 5 do not login as this will create a database. Install the updates (7) and then do the database migration.
After clicking on Goto Login Page it could take a while, until the Login Screen appears. At the first launch of the server, sql scripts are launched to generate tables and add default values.
7. Install Updates
Now install updates / service packs
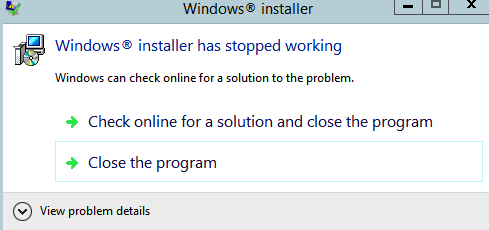
Installation fails
If the installation fails open a ticket and add the log file. To create a log file start the installer with the following command
activation-server6.0.exe /L*V "C:\log\as6install.log"
Install Service Packs
Continue the installation by applying the latest service packs.
Install Operating System Prerequisites manually
In case the download of a prerequisites fails, you can download it manually
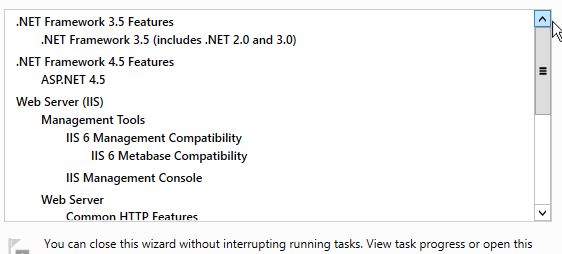
On Windows 2012 Server and newer, the Windows features and roles are installed automatically. The following process is only required in case the installation of prerequisites fail.You can skip this
 | Instal IIS and .NET Framework, ASP.NET 4.5 - Windows 12 Server (manual setup only in case installation fails) |