
All-In-One Protector 7
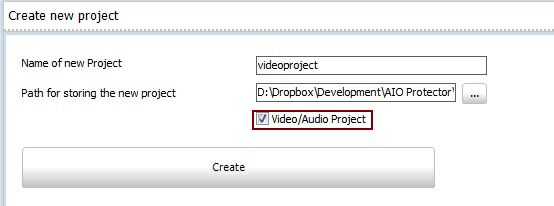
Step 1 - Create a special video / audio project
When you create a project, you have to select the option: Video / Audio Project
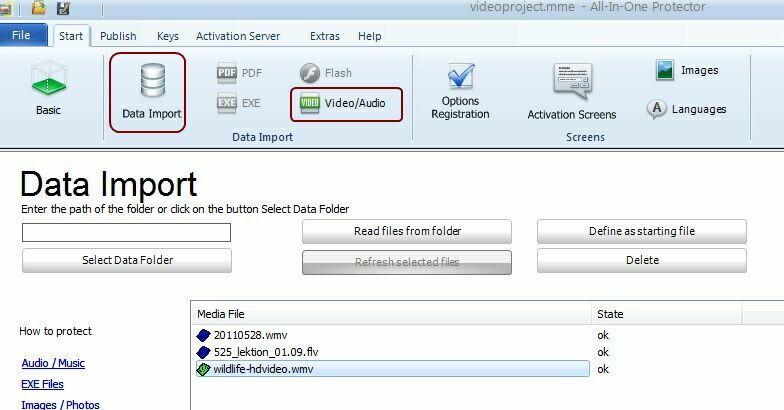
Step 2 - Import video or audio files
Select a folder with video or audio files. Then select the file, which should be loaded as default file when the player starts and press the button: Define as starting file. The file is marked with a green icon 
Step 3 - Define Video / Audio options
Click on the icon  to open the configuration screen for the Video / Audio options. If this option is grayed out
  , then no video files are selected or it is not a video/audio project (see create project).
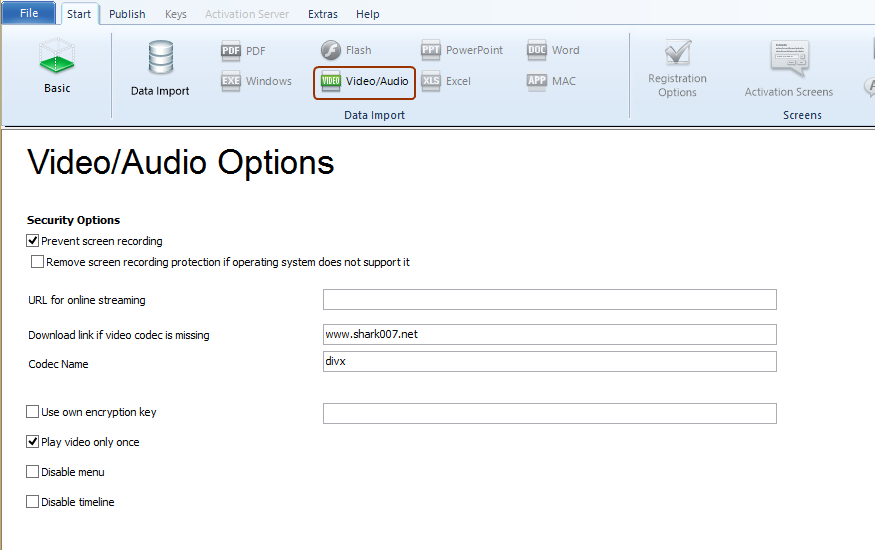
Security Options
Prevent screen recording
Enable the unique All-In-One Protector screen recording protection features. For details click here.

This option should be combined with Don't allow to run on virtual machines to ensure, that in case a virtual machine is used, the screen recording can not be done from the master machine.
Remove screen recording protection if operating system does not support it
The option is only available, if the prevent scree recording option is selected.
This option is relevant for Windows XP with older graphic cards, that do not allow to enable the screenshot protection. As a result, the video would not play at all as capturing of the video file can not be prevented. If you check the option - Remove screenshot protection if operating system does not support it - the video will play but without any protection against screen capture.
URL for Online Streaming
If the video file should not be downloaded but directly streamed from a web server, type in the URL here - details see Online Streaming
Example: http://www.myserver.com/myvideo.wmv.mpvideo
See also: Video - Online Streaming
 This feature requires the All-In-One Protector Premium Plus or Multi-Platform Edition.
Download Link if video codec is missing
Specify the download link and the name of the required codec here.
If a video cannot be played on the PC of the user because the required Codec is missing, an error message appears with the option, to download the missing codec. If this field is left empty, a default download link is used.
Use own encryption key
This option is only for backward compatibility in case you have used an own encryption key with Multimedia Protector.
Play video only once
Once the video has ended, the All-In-One Protector Video Player will terminate.
This option is not supported with FLV files.
Disable Menu
Disables the menu of the All-In-One Protector Video Player. Also right mouse click is disabled which would allow to open a new video.This e.g. prevent that a new video can be loaded using the menu option.
Disable timeline
Disables the timeline of the All-In-One Protector Video Player including shortcuts like forward / backward. This prevents that a video can be played multiple times.
This option is not supported with FLV files.
Step 4 - Open a protected video / audio file
A protected video/audio file can be opened in 4 ways:
•Click on the file with the extension.mpvideo
•Start the EXE file ((All-In-One Player)) and then select a video in the file open dialogue
•Use a menu application which opens the mpvideo file with an hyperlink like it would open a document with the extension pdf or doc
•Use a menu application which starts the All-In-One Player with the command line -f filename.mpvideo - see Open a database
