|
|


Protect PPT using PowerPoint Viewer |

|

|

|

|
||
Protect PPT using PowerPoint Viewer |
|
|
|

|

|
|
|
Protect PPT using PowerPoint Viewer |
|
|
|
|
||
Protect PPT using PowerPoint Viewer |
|
|
|
|
|
Multimedia Protector uses the PowerPoint Viewer to play the protected files. By default, the PowerPoint Viewer is installed when you install PowerPoint, so that you can use the Viewer with the Package a Presentation for CD option. Otherwise you can download the Viewer from the Microsoft Website. Just search in the Online help of PowerPoint how to download the Viewer. If you have Office 2002 or older the Viewer is not working in combination with Multimedia Protector. You have to convert the files to flash.
There are 2 steps to protect the PowerPoint presentation.
The following description refers to PowerPoint 2007 (PPT 2010 is not supported) but the required steps should be similar for other PowerPoint versions.
•On the Microsoft Office Button, point to the arrow next to Publish, and then click Package for CD (in PPT 2003, this option can be found in the menu File)
•In the Package for CD dialog box, in the Name the CD box, type a name for the CD presentation
•Click Options. Under Package type, you must select: Viewer Package (update file formats to run in PowerPoint Viewer), and then select an option in how presentations will play in the viewer list
•To ensure that files that are linked to your presentation are included in the package, select the Linked files check box
•Specify a password for modify/edit (password to open the file should be empty ). This adds just additional security
•Click OK to close the Options dialog box
•Click Copy to Folder, enter a folder name and location, and then click OK.
![]() Create a new folder where you only store the files for this project
Create a new folder where you only store the files for this project
Now import all the files from the project folder you created and mark pptview.exe as startfile using the button Define as starting file. A red icon signals the start file.
The import screen would show the following files if you are using PowerPoint 2007.
 |
| Import Screen - PPT Viewer selected |
![]() Make sure, that you select the folder with the file pptview.exe. If you would import a folder like ..presentation\pptview.exe you get an error message during runtime: playlist.txt can not be found.
Make sure, that you select the folder with the file pptview.exe. If you would import a folder like ..presentation\pptview.exe you get an error message during runtime: playlist.txt can not be found.
A new configuration option appears: EXE Options. Click on the link to open the configuration screen. You have to configure the following settings:
•Run EXE on secure Virtual Zone
•Extract all files
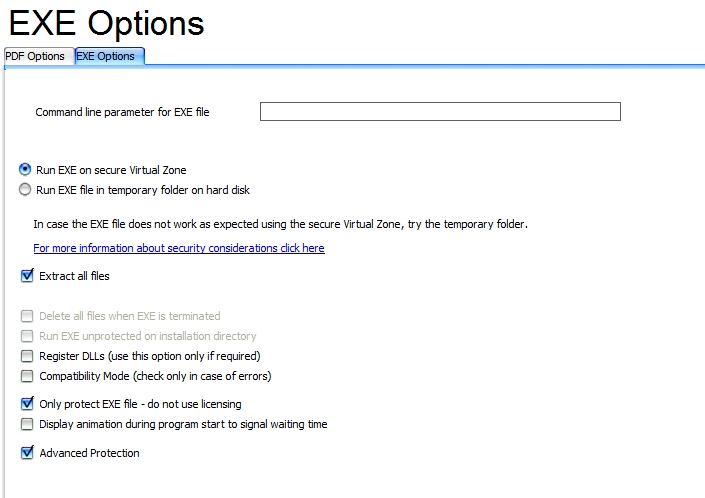
See details: EXE configuration options
![]() The project can contain multiple PPT files as long as they are linked - e.g. PPT file1 has a link to PPT file 2
The project can contain multiple PPT files as long as they are linked - e.g. PPT file1 has a link to PPT file 2
If you have multiple PPT files, which are not linked, we recommend making a menu in PowerPoint (just a presentation with one slide) and link to each presentation.
Example
•Menu.ppt links to course1.ppt and course2.ppt
•In course2.ppt you add a link to menu.ppt
 |
| PPT Menu |
You can then pack all presentations in one database. The menu slide must be the slide you use when you select Package for CD (see above) - all other slides will be added automatically.
If the size of all presentations exceed 250 MB, you have to split the project into several databases (one project for each PPT file) and use a different menu. Otherwise, the time to load the presentation would take too long.
To significantly reduce the size of a PPT presentation, use a tool like http://www.pptminimizer.com
Ensure the Flash Player is installed on your computer, and then please follow the steps below:
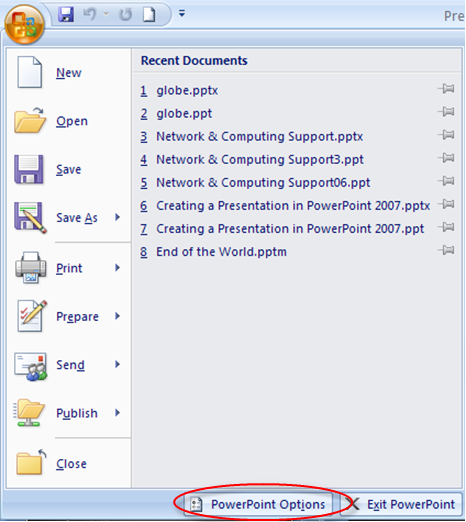
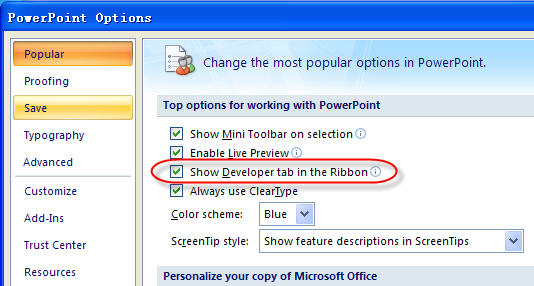
1. Click Microsoft Office Button on the top left corner > click “PowerPoint Options” at the bottom of the panel > go to the “PowerPoint Options” window > click “Popular” on the left column > select “Show Developer tab in the Ribbon” on the right column > click “OK” at the bottom
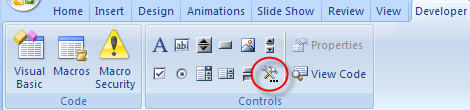
2. On the “Developer” tab > go to “Controls” group > Click the icon of hammer and nail for “More Controls” > go to the “More Controls” window
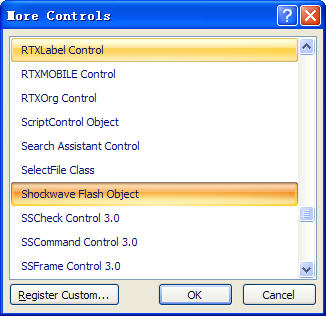
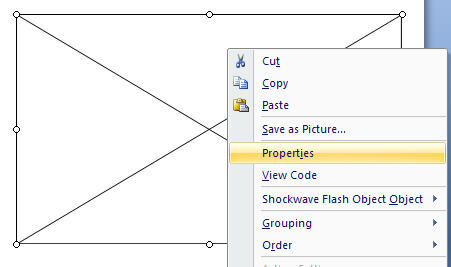
3. On the “More Controls” window > select “Shockwave Flash Object” in the list > click “OK” at the bottom > use your pointer to drag on the slide to draw and resize the control
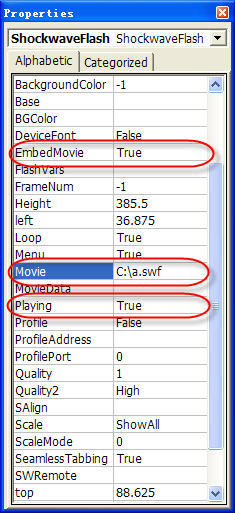
4. Right click the control you draw > click “Properties” in the right-click menu > go to the “Properties” window
5. On the alphabetic tab > click the “Movie” property > type the full drive path in the value column (the blank cell next to Movie), including the file name (e.g. C\:a.swf)
6. To make the Flash play automatically when the slide is displayed, set the “Playing” property to “True“; To embed the Flash into PowerPoint, set “Embed Movie” property to “True”
7. Finally close the “Properties” window and save your presentation. On the View tab, in the Presentation Views group, you can click Slide Show or press F5 to preview your presentation.
|
See also
PowerPoint - different protection options