Press the New User button in the Manage user list view and enter the user data.
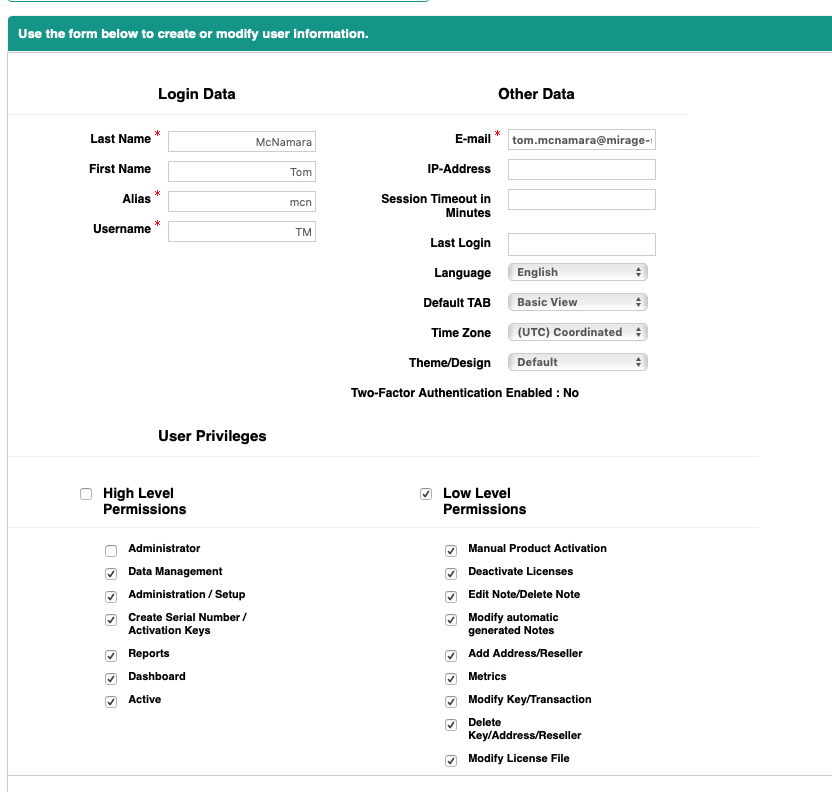
Login Data
Last Name
Last name of the user
First Name
First name of the user
Alias
This name is used for documentation if the user modifies records and should be an abbreviation of the name
Username
This is the name used for login
|
Other Data
E-mail
This E-mail address is used to resend a new password - see Forgot your Password?
The e-mail address must be unique among all users.
IP-address
Restrict the IP-address from which a user can login. Multiple IP addresses can be combined using a semicolon.
Session timeout in minutes
After logging in, a user establishes a session with the Activation Server 6. Use session security to limit exposure to your network when a user leaves his computer unattended while still logged on. It also limits the risk of internal attacks, such as when one employee tries to use another employee's session.
You can control the session expiration time window for user logins. Session expiration allows you to select a timeout for user sessions. The default session timeout is 30 minutes of inactivity. When the session timeout is reached, users are automatically logged out.
Last Login
Date / Time when the user logged in the last time. It is automatically updated.
Language
Select the language of the user interface for this user.
Default TAB
Extended View offers all available data but is slower. If you have more than 50.000 transactions use Basic View. This will speed up the loading of the data and you can select the TAB Extended View in case you need more information. These TABs are available in some views like Key List or Transactions.
Time Zone -
the data is stored in the time zone of the server. To view all data in your own time zone select your time zone in the list.
Theme
Activation Server 6 comes with several different themes to change the user interface to the design you like.
|
User Privileges
The Activation Server 6 allows to specify different user permissions
They are grouped in High- and Low Level Permissions and in permissions on product level

High Level Permissions
High Level permissions specify an area like of access like Data Management or Reports.
Low Level permissions
Low Level permissions specify permissions to specific actions like edit or delete a note or add a new address.
Manual Product Activation
Permission to create an Unlock Key
Deactivate Licenses
Permission to deactivate a license
Edit Note / Delete Note
Permission to edit and delete an existing note. Notes can always be created.
Modify Automated Notes
Permission to edit or delete an automated (generated by the system) note.
Add Address / Reseller
Permission to add a new address or reseller
Metrics
Permission to access metrics
Modify Key / Transaction
Permission to modify a key or transaction. If the permission is disabled, the Save Button is missing
Delete Key / Address / Reseller
Permission to delete a Key, address or reseller. If the permission is disabled, the Delete Button is missing
Modify License File
Permission to
•modify any license file entry like module or data area •add a new module / data area entry or delete a module / data area entry •delete a license file
|
Permissions for products
Only a user, which is an administrator, has access to all products by default. For all other users you have to select the products they can access.
•Check: All products if a user should have access to all products
•Click on the link Individual products to select one or more products the user can access. The user can then only access the selected products. All features like search, create keys, reports are then limited to these products.
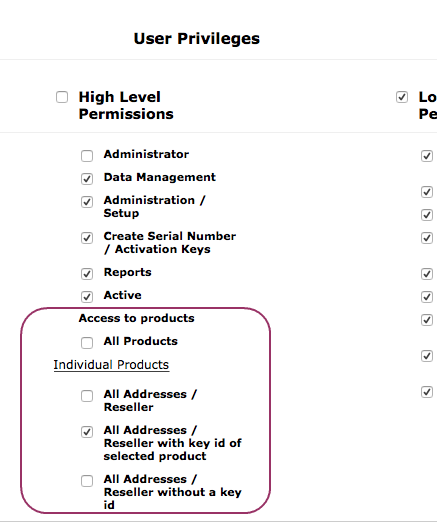
The next step is to grant the access to customer and reseller addresses.
All Addresses / Reseller
No restriction - user sees all addresses of customers and resellers
All Addresses / Reseller with Key/ID of selected product
The user would only see an address where a Serial Number / ID was created and where the key is assigned to an address or reseller AND if it is a key for a product where the user has permission
All Addresses / Reseller without Key/ID
The user would only see an address where no key / ID is assigned
You can select combinations
•All Addresses with and without Key / ID
•If no option is checked you will get a message to select one
Click on the button Save to save the user data. Then assign products to the user.
Click on the button Cancel to leave this screen without saving any data

•A user can always change his password and configure user specific settings in his profile
•Access to products can be defined once the user was created.
Welcome E-Mail
A welcome e-mail is sent to the user with a temporary password which can only be used to reset it and create a new password.

After he logs in he has to change the password. The password change requires the old (temporary) password.
If Two-Factor Authentication is configured, the user will directly be directed to activate that.

•New users cannot be added with the Basic Hosting package


